my daughter drop off her i-buddie model 907. Wanted me to install xp, however when i tried to do so xp could not install modem driver need to update modem drivers don"t know name of modem in computer. anyone out there that can help me out thanks
Install the app
How to install the app on iOS
Follow along with the video below to see how to install our site as a web app on your home screen.
Note: This feature may not be available in some browsers.
You are using an out of date browser. It may not display this or other websites correctly.
You should upgrade or use an alternative browser.
You should upgrade or use an alternative browser.
i-Buddie 4 Desknote Review
- Thread starter Ian
- Start date
Check on www.ecs.com.tw at Downloads section, select Notebook and from the right Archive then A907.
http://www.ecs.com.tw/ECSWeb/Downlo...etailid=151&DetailName=Driver&DetailDesc=A907
http://www.ecs.com.tw/ECSWeb/Downlo...etailid=151&DetailName=Driver&DetailDesc=A907
Hi all I haven't checked this forum in about a year now. So here's an update and if your daring enough a resolution.
Plus I'm interrested if any of you know of a resolution to my battery problem or are experiencing the same. Or if your brave enough can open up your battery and snap a picture of the curcuit board so i can at least compare to mine. (need to be high res)
I realize it's alot of work and the battery is glued shut I don't recommend any of you do this unless you are very careful. But for anyone that does attempt this I'll try to make up for your troubles by providing a fix to the three prong problem
FOLLOWING IS MY EMAIL ORIGINALLY SENT TO: Matt Horne
Wow last time I checked that forum was when I initially had that problem since then I’ve opened up the laptop and fixed the problem myself. I’ve replaced their crappy solder with a slightly higher temperature stuff 40/60 (no the 60/40). This is Radio / TV repair solder it advertises higher temperatures.
Anyways the point is after I’ve fixed my unit I’ve had no further problems…
However just recently and I hope heaven forbid this doesn’t happen to you. My battery stopped beeping…. Yes beeping. The battery still operates for ~2 hrs but the battery will no longer warn me when power is low. Unfortunately I’m no expert in battery technology so I don’t really know where to start with this repair. Initially I thought it was the buzzer but after further tests I’ve confirmed the buzzer was not at fault and it’s probably a faulty capacitor or the battery voltage chip, maybe the tone generator even.
As for that email name and serial:
--- *email deleted*
--- *Serial deleted*
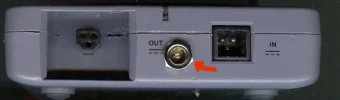
Basically the problem is the third prong that’s the one on the bottom when the notebook is sitting flat on the table, is broken. It melts the power cord.
To fix this problem you need to open up the computer sand the contact on the third prong because the initial point of contact is not great enough to transmit 90W without heat. And resolder the prong back making sure that at least ½ the circumference of the protrusion is soldered in place with the metal shielding around the plug. If done properly you will not have any further heating. If done improperly the unit will heat again due to resistance and the solder will melt causing less contact and more heating until the unit won’t power on.
Signs that this is your problem.
A. if you plug in the AC adaptor (not the battery) and put your ear up to the power plug and you hear a high pitched whinning sound when the laptop is not on.
What you are hearing is the electricity arching across the prong to try and get to the transformer but because of high resistance it never quite gets there when the laptop is off.
B. If you laptop will no longer power on with the battery adaptor but will power on with the AC.
This is a STOP USING YOUR LAPTOP SITUATION I repeat do not use your laptop further! What's happening is that your battery cannot provide enough current to run your laptop which means the power adaptor is giving way more power than its rated for to boost your laptop to life.
If the above situation holds than you've reached a no turning back point either ECS repairs it or your going to have to repair it yourself.
Ok because this article is getting long the next one is going to be rough details on how to open the case should you choose to attempt recover the unit yourself or if ECS is being a b*tch like in my case touting physical damage.
Plus I'm interrested if any of you know of a resolution to my battery problem or are experiencing the same. Or if your brave enough can open up your battery and snap a picture of the curcuit board so i can at least compare to mine. (need to be high res)
I realize it's alot of work and the battery is glued shut I don't recommend any of you do this unless you are very careful. But for anyone that does attempt this I'll try to make up for your troubles by providing a fix to the three prong problem
FOLLOWING IS MY EMAIL ORIGINALLY SENT TO: Matt Horne
Wow last time I checked that forum was when I initially had that problem since then I’ve opened up the laptop and fixed the problem myself. I’ve replaced their crappy solder with a slightly higher temperature stuff 40/60 (no the 60/40). This is Radio / TV repair solder it advertises higher temperatures.
Anyways the point is after I’ve fixed my unit I’ve had no further problems…
However just recently and I hope heaven forbid this doesn’t happen to you. My battery stopped beeping…. Yes beeping. The battery still operates for ~2 hrs but the battery will no longer warn me when power is low. Unfortunately I’m no expert in battery technology so I don’t really know where to start with this repair. Initially I thought it was the buzzer but after further tests I’ve confirmed the buzzer was not at fault and it’s probably a faulty capacitor or the battery voltage chip, maybe the tone generator even.
As for that email name and serial:
--- *email deleted*
--- *Serial deleted*
Basically the problem is the third prong that’s the one on the bottom when the notebook is sitting flat on the table, is broken. It melts the power cord.
To fix this problem you need to open up the computer sand the contact on the third prong because the initial point of contact is not great enough to transmit 90W without heat. And resolder the prong back making sure that at least ½ the circumference of the protrusion is soldered in place with the metal shielding around the plug. If done properly you will not have any further heating. If done improperly the unit will heat again due to resistance and the solder will melt causing less contact and more heating until the unit won’t power on.
Signs that this is your problem.
A. if you plug in the AC adaptor (not the battery) and put your ear up to the power plug and you hear a high pitched whinning sound when the laptop is not on.
What you are hearing is the electricity arching across the prong to try and get to the transformer but because of high resistance it never quite gets there when the laptop is off.
B. If you laptop will no longer power on with the battery adaptor but will power on with the AC.
This is a STOP USING YOUR LAPTOP SITUATION I repeat do not use your laptop further! What's happening is that your battery cannot provide enough current to run your laptop which means the power adaptor is giving way more power than its rated for to boost your laptop to life.
If the above situation holds than you've reached a no turning back point either ECS repairs it or your going to have to repair it yourself.
Ok because this article is getting long the next one is going to be rough details on how to open the case should you choose to attempt recover the unit yourself or if ECS is being a b*tch like in my case touting physical damage.
- Joined
- Jul 10, 2004
- Messages
- 3
- Reaction score
- 0
My desknote A928 has never given me any problems, i use it everywhere. I have always kept the airflow unobstructed, and i have kept the heatsync cleaned. My power cord newer heats up(it never even gets warm), and my desknote never overheats. Yeah it MAY GET WARM, BUT ALL LAPTOPS DO.
Do
A) keep vents unobstructed (especially the CPU vents)
B) clean out heatsync
Dont
A) Overclock CPU
b) Leave it sitting on your bed or couch
C) Block vents
P4 2.0ghz (Willamette)
512MB ram
18.1 GB HDD
DVD/CD-RW drive
Do
A) keep vents unobstructed (especially the CPU vents)
B) clean out heatsync
Dont
A) Overclock CPU
b) Leave it sitting on your bed or couch
C) Block vents
P4 2.0ghz (Willamette)
512MB ram
18.1 GB HDD
DVD/CD-RW drive
How to open the desknote:
OK suffice to say it's been a while since I did it. I really wish I had a digital camera now so I can take pics while opening up the unit... I'll try my best at describing what to do.
There's an excellent article at : http://www.amdmb.com/article-display.php?ArticleID=195&PageID=4 unfortunately it's on the 929 not the 928 that we have.
1. First you must remove all screws from the bottom.
- Start by removing screws from all the expansion slots and drive bays. Don't worry about removing the proccessor / heat sink yet (we'll take care of that later).
2. After the inital screws are done you need to take out your hard drive ram and CD rom drive. The hard drive and ram should just slide out. The CD rom likewise but might feel like it's stuck initially.
3. After all that's been done start removing all the remaining screws on the bottom of the laptop, I can't remember how many there are but there are quite a few.
- There are 3 hidden screws to watch for 1 is where the ram shield is remove that. Once you remove the ramshield there are two additional screws under the ramshield.
4. still with me? Good and if not well I guess post up here I'll try and see what I can do to explain.
- So hopefully if I remembered right that's all the screws on the bottom. Now comes the tricky part make sure that you have room to hold your LCD panel either a large sponge or a large soft cloth will do.
5. Separating the LCD. unfortunately 1/2 the components that hold the case in place have screws under the LCD so you need to remove it to gain access to them.
- To remove the LCD from the main unit you first need to remove the two plastic covers.
- Now this is abit hard to explain what you need to do is take a paper clip and pull the round half cylinder like clip away from the hooks
- What I suggest is take a paperclip and pry one end of the clip towards you then examine it so you understand how to unclip it.
DO NOT PULL STRAIGHT UP or DO NOT EXERT HEAVY FORCE on the clip the clips are elastic somewhat but they will break if you do this.
6. Underneath the screws are 4 additional screws for the LCD what you need to do is remove them but do it with the LCD either closed or in a position so that it'll be easy to reinstall the screws.
7. After the LCD panel is removed you should discover that the power mail and email buttons are also part of another panel remove this panel and all the additional screws you can see (sorry can't remember exactly what they where)
- the important thing is that you remove the control buttons (internet power email) once this unit is removed and you unclipped the wire underneath this unit are two more wires for the LCD.
- Unclip the two wires underneath the LCD making note of which way was "up" you'll need this later.
8. Go get a glass of water or take a 5 min break don't drink coffiee you don't need jitters for the next step. Most importantly review what you've just taken apart take pictures or notes at this point. If you forget you'll have extra parts when your done.
9. Ok no it's time to void the warrenty, yes *GASP* you haven't voided the warrenty yet!
- This is arguable the toughest (other than the LCD removal which is #1) part because if done wrong you could destroy your keyboard.
- Once again you need that paper clip... Yes that trusty paper clip what can't it do") .
.
- Ok now follow me to where I point you with these words it's somewhat hard to see.
- right above the right cursor and below the "end" key there's a blank spot right? What I mean is a flat peice.
- Along the right edge of this flat peice midway - up and down there should be a hole if not take you paper clip and go along the edge of this piece until you find the hole.
- Once you found the hole you need to pry up the keyboard just slightly you can't remove it yet until you unclipped it.
- with this slight bit of pressure on the keyboard (forcing the keyboard upward) right under the down cursor there's a clip holding the keyboard down. Using a flat head screw driver push the clip towards the speakers and the keyboard should "pop" the first clip.
- Now run your paper clip along to give the keyboard pressure and continue but DO NOT!!!!!!!!!!!! pass the right ALT key with the paper clip if you do you will cut the ribbon wire and the keyboard will be broken.
- Once you popped all the clips you keyboard should lift up without resistance.
10. Remove the shield, and unclip the ribbon wire from it's seating once again not the position or which side is "up" so you don't put it back in upside down.
11. Remove the screws from this compartment. Notice that some are under warrenty void if broken stickers.
12. If all was done correctly and if I rememembered all the screws the case should start to come apart now you should be able to remove the top from the bottom.
DO NOT PULL before your ready to completely separate the top from bottom you need to unplug the touchpad. I forgot where the wire was located so your gonna have to be careful with this one.
13. Once the top and bottom case is separate to gain access to the power prong you need to remove the mother board. To do that you need to do the following.
14. Remove all screws from the metal shield and speakers.
Also if you haven't done so already this would be a good time to remove the heatsink the CPU can stay in the socket so it doesn't get lost.
!!!! Once you've removed all the screws don't forget the ones in the back the hex screws that hold the printer and vga connectors tight to the box have to be removed as well.
----- forgot what else you might need to do so post if your lost ----
Now the good part: Once you got the motherboard separated from the case this is the fix.
MAKE SURE YOUR HOUSE IS STATIC FREE OR AT LEAST YOU DO NOT DISCHARGE ON TO THE MOTHER BOARD AS YOU WILL FRY IT.
THE FIX
1. Once you've found the power prong you need to test to see if it's loose, do that by pushing it with your finger see if it "wiggles"
2. If it doesn't do your best so clean and sand the back of the prong so you can resolder it in place.
3. IF YOU WANT TO FIX IT BETTER THAN ECS DESIGNED IT FOLLOW THESE STEPS
OK your gonna have to do some careful yanking. If your laptop won't give don't bother as it's not melted enough to yank.
Make sure you remove the solder connection from the prong and then begin yanking.
Grab the tird prong with a pair of pliers and yank it out (yes yank it forcefully out) careful that you don't damage the sorrounding plug.
Here's the tedious part, you now need to sand down the end of the prong including the area where the prong's circumference is reduced or the divit so the prong will stay in place in the socket.
Sand carefully because the better you sand the better it will adhere to your solder.
Once all of that's done take flux (yes you need flux the stuff inside the solder is crappy and won't do) and dip the end you just sanded into it.
Now do the same sanding and cleaning for the part of the metal shield your gonna solder the prong back on to.
*** here's the moment of truth, get the most heat resistant solder you can find that conducts well.
Push the prong back into the socket and make sure the alignment is correct with one had pushing the prong so it's at the very back and the other hand with the soldering iron and solder, heat the prong until the solder will adhere to the prong and metal sheild around the socket.
It is critical that you make a good connection here, since ECS can't even do that much.
Once done apply the solder generously without letting it glob this should allow enough fall back so there's a good connection between the joints.
Before you reassemble once everything is fixed you need to plug the power plug or battery plug back in to make sure that your plug is aligned and straight.
Now all you have to do is reassemble the laptop which is everything above in reverse.
Whew I thought I'd never finish this....! wow it took me 1 hr to write.
I hope this helps those that are willing to try the dangerous route. I'd say for you sake though let the email pettition thingy run its course though I mean if he gets through maybe ECS will fix or give refund.
Oh can anyone help me out with my battery problem since I'm here or am I the only tech geek stupid enough to buy this notebook because of power greed? (geeks status = MHz of your laptop)
OK suffice to say it's been a while since I did it. I really wish I had a digital camera now so I can take pics while opening up the unit... I'll try my best at describing what to do.
There's an excellent article at : http://www.amdmb.com/article-display.php?ArticleID=195&PageID=4 unfortunately it's on the 929 not the 928 that we have.
1. First you must remove all screws from the bottom.
- Start by removing screws from all the expansion slots and drive bays. Don't worry about removing the proccessor / heat sink yet (we'll take care of that later).
2. After the inital screws are done you need to take out your hard drive ram and CD rom drive. The hard drive and ram should just slide out. The CD rom likewise but might feel like it's stuck initially.
3. After all that's been done start removing all the remaining screws on the bottom of the laptop, I can't remember how many there are but there are quite a few.
- There are 3 hidden screws to watch for 1 is where the ram shield is remove that. Once you remove the ramshield there are two additional screws under the ramshield.
4. still with me? Good and if not well I guess post up here I'll try and see what I can do to explain.
- So hopefully if I remembered right that's all the screws on the bottom. Now comes the tricky part make sure that you have room to hold your LCD panel either a large sponge or a large soft cloth will do.
5. Separating the LCD. unfortunately 1/2 the components that hold the case in place have screws under the LCD so you need to remove it to gain access to them.
- To remove the LCD from the main unit you first need to remove the two plastic covers.
- Now this is abit hard to explain what you need to do is take a paper clip and pull the round half cylinder like clip away from the hooks
- What I suggest is take a paperclip and pry one end of the clip towards you then examine it so you understand how to unclip it.
DO NOT PULL STRAIGHT UP or DO NOT EXERT HEAVY FORCE on the clip the clips are elastic somewhat but they will break if you do this.
6. Underneath the screws are 4 additional screws for the LCD what you need to do is remove them but do it with the LCD either closed or in a position so that it'll be easy to reinstall the screws.
7. After the LCD panel is removed you should discover that the power mail and email buttons are also part of another panel remove this panel and all the additional screws you can see (sorry can't remember exactly what they where)
- the important thing is that you remove the control buttons (internet power email) once this unit is removed and you unclipped the wire underneath this unit are two more wires for the LCD.
- Unclip the two wires underneath the LCD making note of which way was "up" you'll need this later.
8. Go get a glass of water or take a 5 min break don't drink coffiee you don't need jitters for the next step. Most importantly review what you've just taken apart take pictures or notes at this point. If you forget you'll have extra parts when your done.
9. Ok no it's time to void the warrenty, yes *GASP* you haven't voided the warrenty yet!
- This is arguable the toughest (other than the LCD removal which is #1) part because if done wrong you could destroy your keyboard.
- Once again you need that paper clip... Yes that trusty paper clip what can't it do
.- Ok now follow me to where I point you with these words it's somewhat hard to see.
- right above the right cursor and below the "end" key there's a blank spot right? What I mean is a flat peice.
- Along the right edge of this flat peice midway - up and down there should be a hole if not take you paper clip and go along the edge of this piece until you find the hole.
- Once you found the hole you need to pry up the keyboard just slightly you can't remove it yet until you unclipped it.
- with this slight bit of pressure on the keyboard (forcing the keyboard upward) right under the down cursor there's a clip holding the keyboard down. Using a flat head screw driver push the clip towards the speakers and the keyboard should "pop" the first clip.
- Now run your paper clip along to give the keyboard pressure and continue but DO NOT!!!!!!!!!!!! pass the right ALT key with the paper clip if you do you will cut the ribbon wire and the keyboard will be broken.
- Once you popped all the clips you keyboard should lift up without resistance.
10. Remove the shield, and unclip the ribbon wire from it's seating once again not the position or which side is "up" so you don't put it back in upside down.
11. Remove the screws from this compartment. Notice that some are under warrenty void if broken stickers.
12. If all was done correctly and if I rememembered all the screws the case should start to come apart now you should be able to remove the top from the bottom.
DO NOT PULL before your ready to completely separate the top from bottom you need to unplug the touchpad. I forgot where the wire was located so your gonna have to be careful with this one.
13. Once the top and bottom case is separate to gain access to the power prong you need to remove the mother board. To do that you need to do the following.
14. Remove all screws from the metal shield and speakers.
Also if you haven't done so already this would be a good time to remove the heatsink the CPU can stay in the socket so it doesn't get lost.
!!!! Once you've removed all the screws don't forget the ones in the back the hex screws that hold the printer and vga connectors tight to the box have to be removed as well.
----- forgot what else you might need to do so post if your lost ----
Now the good part: Once you got the motherboard separated from the case this is the fix.
MAKE SURE YOUR HOUSE IS STATIC FREE OR AT LEAST YOU DO NOT DISCHARGE ON TO THE MOTHER BOARD AS YOU WILL FRY IT.
THE FIX
1. Once you've found the power prong you need to test to see if it's loose, do that by pushing it with your finger see if it "wiggles"
2. If it doesn't do your best so clean and sand the back of the prong so you can resolder it in place.
3. IF YOU WANT TO FIX IT BETTER THAN ECS DESIGNED IT FOLLOW THESE STEPS
OK your gonna have to do some careful yanking. If your laptop won't give don't bother as it's not melted enough to yank.
Make sure you remove the solder connection from the prong and then begin yanking.
Grab the tird prong with a pair of pliers and yank it out (yes yank it forcefully out) careful that you don't damage the sorrounding plug.
Here's the tedious part, you now need to sand down the end of the prong including the area where the prong's circumference is reduced or the divit so the prong will stay in place in the socket.
Sand carefully because the better you sand the better it will adhere to your solder.
Once all of that's done take flux (yes you need flux the stuff inside the solder is crappy and won't do) and dip the end you just sanded into it.
Now do the same sanding and cleaning for the part of the metal shield your gonna solder the prong back on to.
*** here's the moment of truth, get the most heat resistant solder you can find that conducts well.
Push the prong back into the socket and make sure the alignment is correct with one had pushing the prong so it's at the very back and the other hand with the soldering iron and solder, heat the prong until the solder will adhere to the prong and metal sheild around the socket.
It is critical that you make a good connection here, since ECS can't even do that much.
Once done apply the solder generously without letting it glob this should allow enough fall back so there's a good connection between the joints.
Before you reassemble once everything is fixed you need to plug the power plug or battery plug back in to make sure that your plug is aligned and straight.
Now all you have to do is reassemble the laptop which is everything above in reverse.
Whew I thought I'd never finish this....! wow it took me 1 hr to write.
I hope this helps those that are willing to try the dangerous route. I'd say for you sake though let the email pettition thingy run its course though I mean if he gets through maybe ECS will fix or give refund.
Oh can anyone help me out with my battery problem since I'm here or am I the only tech geek stupid enough to buy this notebook because of power greed? (geeks status = MHz of your laptop)
Unfortunately you are a lucky one the situation we are talking about (now 6 confirmed cases) is a design flaw I'm sure of this since I've actually opened up my unit to examine the damage.
It could've been easily avoided but sadly it was not.
Give it time yours will develoup the issue after 2-3 years.
It could've been easily avoided but sadly it was not.
Give it time yours will develoup the issue after 2-3 years.
ugosterling said:My desknote A928 has never given me any problems, i use it everywhere. I have always kept the airflow unobstructed, and i have kept the heatsync cleaned. My power cord newer heats up(it never even gets warm), and my desknote never overheats. Yeah it MAY GET WARM, BUT ALL LAPTOPS DO.
Do
A) keep vents unobstructed (especially the CPU vents)
B) clean out heatsync
Dont
A) Overclock CPU
b) Leave it sitting on your bed or couch
C) Block vents
P4 2.0ghz (Willamette)
512MB ram
18.1 GB HDD
DVD/CD-RW drive
- Joined
- Jul 10, 2004
- Messages
- 3
- Reaction score
- 0
I will keep a close eye on the behavior of my desknote and will post more later
Just wanted to pass on my experience with my desknote
Got the same problem as everyone else with the adapter heating and the pin pulling off the mother board.
I emailed at desknote.net and sent the them $35 they wanted (wasnt happy with this). It is impossible to speak with or email anyone there.
I then got a notice to send my unit to Toronto. I am just outside of Toronto.
I drove my unit it and actually got the phone number to the guy who fixes the laptops for desknote.net in toronto.
He repaired my laptop and I picked it up within 24 hours and it cost $99USD.
Must say I am not happy with the support but having a guy within 30 minutes of me who fixes these is a lifesaver. This overheating problem is obviously a manufacturers design defect but ECS separates themselves so far from the consumer its a pain in the ass.
I bought my unit from internetishop in California and must say they are not much better.
Have bought 4 computers and practically had to rebuild most of them.
The battery picture this is not going to be for a long time, because this is on a friend's server that i have access to, but i can't leave this big file there, so i'll remove it in this week.Vortex-5 said:Hi all I haven't checked this forum in about a year now. So here's an update and if your daring enough a resolution.
Plus I'm interrested if any of you know of a resolution to my battery problem or are experiencing the same. Or if your brave enough can open up your battery and snap a picture of the curcuit board so i can at least compare to mine. (need to be high res)
I realize it's alot of work and the battery is glued shut I don't recommend any of you do this unless you are very careful. But for anyone that does attempt this I'll try to make up for your troubles by providing a fix to the three prong problem
My battery is also not working...
when i'm trying to recharge it, it blink in orange (ok), but a few minutes later, it blinks green/red (bad - go to service - but as we all know there is no service for ECS products...
 ) - this happend when the AC cable melted in the battery, if anybody knows a solution, how to fix it, please... contact me. but any way, i scanned my battery, maybe this will help you, Vortex-5.
 i'm going to backup all my computer and try what Vortex-5 said...
wish me luck...
By the way, my half melted cable (the current one) is very hard to plug and unplug, what about it?
Last edited:
i'm after backup.
i just opened the bay of the CPU, and took out the some kind of metal was there on the CPU, and i discovered:
i'm cleaning now...
answer me please...
i just opened the bay of the CPU, and took out the some kind of metal was there on the CPU, and i discovered:
- it's a little bit dusty
- the cpu's cover (some kind of plastic or something else) is fried...
i'm cleaning now...
answer me please...
Heres my info also on some of these threads is som pictures. Mine never did work when I pulled the the power plug out of the computer. I was fixed last year and is still working fine. Although it still gets hot and I do not play any gmes on it anymore.
http://discussions.virtualdr.com/showthread.php?threadid=133550&highlight=ibuddie+928
http://discussions.virtualdr.com/showthread.php?threadid=133550&highlight=ibuddie+928
- Joined
- Jul 10, 2004
- Messages
- 3
- Reaction score
- 0
Was the thing you pulled off the cpu copper colered or was it silver?
The copper thing is the heatsync, and the silver paste is thermal gel (its sometimes white, and it lookes like melted plastic)
The copper thing is the heatsync, and the silver paste is thermal gel (its sometimes white, and it lookes like melted plastic)
it was pasted on the cpu, but when i pulled the heatsync from the CPU, i pulled also a half of the way of this thing, so now it's not on the cpu...
i just asked what is that?
it looks very black (but this is not the original color), it's seems to me that the heat make this thingy black... the hot temperature of the cpu, made this kind of thing like this.
i just asked what is that?
it looks very black (but this is not the original color), it's seems to me that the heat make this thingy black... the hot temperature of the cpu, made this kind of thing like this.
- Joined
- Mar 5, 2002
- Messages
- 25,772
- Reaction score
- 1,224
")

Hi!
I went to an Electronic Engineer, and he told me that the end of connector of the cable (that one - that's always melts) is not sufficient to pass 4.74 Amper on it.
He says it's like a little stove... it have a lot of resistance and that's why the heat is generated.
Any way he installed a new end of the cable (that holds 8 or 10 Amper, as he said), and a new sockets (in the battery, and in the laptop) to the new end of the cable.
i paid 550 Shekels (123$ USD) and i also get 3 month warrenty on the job. I hope this will solve the problem...
Mennie.
Attachments
Last edited:
Is it possible that the battery is causing all the problems. I haven't used the battery hardly at all by itself just use it as a power surge. My battery is still working. But the end of the battery that connected into the laptop also got burnt and I replaced it when my laptop was repaired.
Hi,
Interesting thread - since I've recently encountered the same problem with my 2 year old A928 myself, i.e., it began to get extremely hot, then melted the power connector (possibly yanking out the ground pin, I can't be sure). It now clicks epileptically when I try to power it up, unless I have the chord angled just right... I'm thinking of dropping it in to a general laptop repair guy here in Dublin, since there are no ECS dealers in the country, but I wanted to be sure exactly what to tell them before I do that (so that if/when they try to hit me with a €200 invoice, I can just tell them that I'll have the pin soldered elsewhere). Electronics aren't my thing, so I would be nervous of attempting Vortex-5's (excellently written) repair procedure myself, but if I give the same details to a qualified electronic engineer, I would expect that the job would be relatively trivial for a professional.
Assuming I can get the thing back in working order, I will definitely invest in a cooling system like the one described by tcbbsb, and hope that the system stands up for another year or so. I've no real regrets (as I picked it up second-hand in Canada for about €600), but I agree ECS should take responsibility for this huge design flaw, even by just posting an obvious errata notice on their web-site, perhaps describing the symptoms and how to take preventative action. Count me in for any petition-signing or litigation threats. :-|
This is the only problem I've run into with my A928 - all the hardware is supported on 32-bit Windows, using the driver-sets on the CD that ships with the Desknote, and the SiS chipsets are generally excellently supported under FreeBSD/Linux, too. Personally I like the design. But this power-connector issue is a Very Big Problem. I would therefore not recommend the A928 to anybody until ECS have addressed it.
- Joined
- Jul 22, 2004
- Messages
- 2
- Reaction score
- 0
Hey,
I recently fixed my ground prong aswell, I was wondering if desknote.net is always out of stock on the battery to desknote cables since if they are I would have to buy it for a more expensive price somewhere else. Thanks let me know.
I recently fixed my ground prong aswell, I was wondering if desknote.net is always out of stock on the battery to desknote cables since if they are I would have to buy it for a more expensive price somewhere else. Thanks let me know.
Ask a Question
Want to reply to this thread or ask your own question?
You'll need to choose a username for the site, which only take a couple of moments. After that, you can post your question and our members will help you out.