1. What is AVCHD?
AVCHD stands for "Advanced Video Codec High Definition", the format was jointly established by both Panasonic and Sony in 2006. The "AVCHD" is a brand new high definition (HD) digital video camera recorder format recording 1080i*1 and 720p*2 signals onto certain media by using highly efficient codec technologies. The "AVCHD" is jointly established by Panasonic, the brand name for which Matsushita Electric Industrial Co., Ltd. is known and Sony Corporation.
AVCHD video is recorded using the MPEG-4 AVC/H.264 video compression codec. In AVCHD compression, audio is stored in a compressed form (Dolby AC-3). What makes AVCHD a unique and advanced compression is that it includes features to improve media presentation such as: menu navigation, slide shows and subtitles.
2.how to edit AVCHD video files on Mac
This is the step by step guide for Wondershare Video Converter Pro for Mac to show you how to convert video (including HD video, MKV, WMV, AVCHD, AVI, MOV, FLV, MOD, TOD etc) to portable device, Apple optimized format or HD MKV, WMV, AVI video.
Free Download Video Converter Pro for Mac and install it.
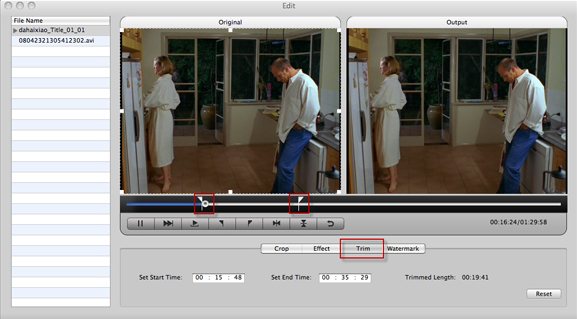
1. Trim segments
If you just want to convert clips from video movie, you can click the Trim icon to capture a clip. In the Trim window, you can trim the length of the current video by dragging the Start Time and End Time sliders.
Click Reset to remove all the trimming effects.
2. Crop output video size
Here you are allowed to crop video to remove the black edges around your movie video, so you can watch your movies on your portable players in full screen.
Note: Before you start to crop your movie video, you can select an output aspect ratio from the “Zoom” list. There are six choices available: Full Screen, Keep Original, 16:9, 4:3, Letter Box and Pan & Scan. After you select an output aspect ratio and finish the cropping, the result will be shown at the same time in the Output window.
Click Reset to remove all the cropping effects.
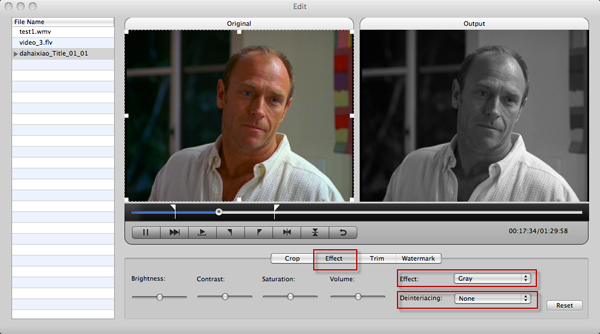
3. Adjust effect of the output video
You can adjust the video effects by adjusting the following parameters:
* Brightness: Drag the Brightness adjustment slider to set the brightness of the video.
* Contrast: Drag the Contrast adjustment slider to set the contrast of the video.
* Saturation: Drag the Saturation adjustment slider to set the saturation of the video.
* Volume: Drag the Volume adjustment slider to set the volume of the audio.
* Effect: Select a special effect from the Effect drop-down list for the video. The available choices are No Effect, Gray, Emboss, Negative, Black White, White Black, Old Film.
* Deinterlacing: There are five options available for you to choose: None, Repeat Odd Filed, Repeat Even Field, Odd Interpolate and Even Interpolate.
Click Reset to remove all the effects.
4. Add Watermark on output video
There are two kinds of watermarks for you: Image Watermark and Test Watermark.
You can click “Apply to All” option and then click OK to apply the current watermark settings to all the imported files.
Click Reset to remove all the watermark effects.
With Wondershare Video Converter Pro for Mac, just convert all video and dvd files as your like, from now on, to enjoy digital life becomes so easy!
Related articles:
Tips for Wondershare Video Converter Pro for Mac
How to use Video Converter Pro for Mac to convert Videos and rip DVDs
AVCHD stands for "Advanced Video Codec High Definition", the format was jointly established by both Panasonic and Sony in 2006. The "AVCHD" is a brand new high definition (HD) digital video camera recorder format recording 1080i*1 and 720p*2 signals onto certain media by using highly efficient codec technologies. The "AVCHD" is jointly established by Panasonic, the brand name for which Matsushita Electric Industrial Co., Ltd. is known and Sony Corporation.
AVCHD video is recorded using the MPEG-4 AVC/H.264 video compression codec. In AVCHD compression, audio is stored in a compressed form (Dolby AC-3). What makes AVCHD a unique and advanced compression is that it includes features to improve media presentation such as: menu navigation, slide shows and subtitles.
2.how to edit AVCHD video files on Mac
This is the step by step guide for Wondershare Video Converter Pro for Mac to show you how to convert video (including HD video, MKV, WMV, AVCHD, AVI, MOV, FLV, MOD, TOD etc) to portable device, Apple optimized format or HD MKV, WMV, AVI video.
Free Download Video Converter Pro for Mac and install it.
1. Trim segments
If you just want to convert clips from video movie, you can click the Trim icon to capture a clip. In the Trim window, you can trim the length of the current video by dragging the Start Time and End Time sliders.
Click Reset to remove all the trimming effects.
2. Crop output video size
Here you are allowed to crop video to remove the black edges around your movie video, so you can watch your movies on your portable players in full screen.
Note: Before you start to crop your movie video, you can select an output aspect ratio from the “Zoom” list. There are six choices available: Full Screen, Keep Original, 16:9, 4:3, Letter Box and Pan & Scan. After you select an output aspect ratio and finish the cropping, the result will be shown at the same time in the Output window.
Click Reset to remove all the cropping effects.
3. Adjust effect of the output video
You can adjust the video effects by adjusting the following parameters:
* Brightness: Drag the Brightness adjustment slider to set the brightness of the video.
* Contrast: Drag the Contrast adjustment slider to set the contrast of the video.
* Saturation: Drag the Saturation adjustment slider to set the saturation of the video.
* Volume: Drag the Volume adjustment slider to set the volume of the audio.
* Effect: Select a special effect from the Effect drop-down list for the video. The available choices are No Effect, Gray, Emboss, Negative, Black White, White Black, Old Film.
* Deinterlacing: There are five options available for you to choose: None, Repeat Odd Filed, Repeat Even Field, Odd Interpolate and Even Interpolate.
Click Reset to remove all the effects.
4. Add Watermark on output video
There are two kinds of watermarks for you: Image Watermark and Test Watermark.
You can click “Apply to All” option and then click OK to apply the current watermark settings to all the imported files.
Click Reset to remove all the watermark effects.
With Wondershare Video Converter Pro for Mac, just convert all video and dvd files as your like, from now on, to enjoy digital life becomes so easy!
Related articles:
Tips for Wondershare Video Converter Pro for Mac
How to use Video Converter Pro for Mac to convert Videos and rip DVDs